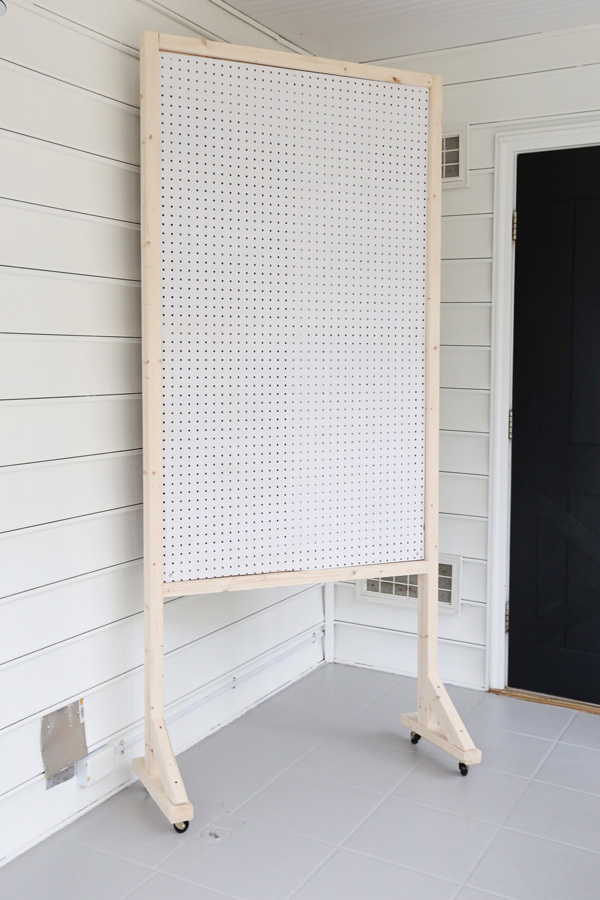
I used these pegboard hooks and tool holders (also here) to complete our diy pegboard tool organizer! Read customer reviews & find best sellers The final size of this pegboard wall is 48″ wide x 43″ tall but it can easily be adjusted if needed to the custom size you need for your wall! This is one of my favorite garage paint colors! Here is the cut size for the pegboard : Attach the two side 1×4 @ 43″ pre-primed trim boards to the sides of the back frame with 1 1/4″ brad nails and a nail gun. Install the two vertical 1×2 @ 43″ boards at these marks on each side. Our new diy pegboar. I used three nails along the top, middle, and bottom of the pegboard, just like i did on our free standing pegboard wall diy. These are the same peg hooks i used for our mobile diy pegboard stand. Paint the diy pegboard wall if desired again you can get the complete tutorial above! Learn how to build an easy diy pegboard wall that is perfect for tool organization, craft supplies, kitchens, an office, closet, laundry room, and more! · this article provides a comprehensive, step-by-step guide to constructing a functional and visually appealing peg board from scratch, helping you maximize storage while adding a touch of creativity to your home or workspace. It depends on the material you use, but it is not significantly cheaper to make your own pegboard. This guide covers planning, construction, and installation, transforming your cluttered space into an efficient, tidy work area. Install the pegboard on top of the 1×2 furring boards with 1″ nails through the peg holes. If you used plywood to make your own you aren’t going to save much money and the time spent drilling lots of holes is not usually worth it to save a few dollars. Add pegboard hooks and pegboard holders to the diy pegboard wall organizer to help organize your items! Browse & discover thousands of brands. 12-month warranty · global warehousing · fast & reliable shipping · 24/7 customer service Next, install the top and bottom 1×4 @ 41″ pre-primed trim boards with 1 1/4″ brad nails. Amazon. com has been visited by 1m+ users in the past month Then, mark with a level where the top of the pegboard frame will be. Build the back frame of pegboard wall and secure to the wall studs 3. See all of this in action in the diy pegboard wall video! Make the lumber cuts for the diy pegboard wall 2. Time for the fun part of this diy pegboard organizer! Install the pegboard to the back frame 5. Or you can use a table saw or circular saw and straight edge guide to make the cut yourself if you prefer. · build a diy pegboard for your craft room or garage. This painted pegboard idea is great to help keep your craft supplies organized. · in this guide, we’ll show you how to build a modern diy pegboard for organizing spaces, complete with step-by-step instructions, creative ideas, and tips for customizing it to match your home decor. And for more garage storage ideas, check out our. How do you make a peg board wall? Shop our huge selection of tools & equipment online with 12-month warranty. I painted the diy pegboard wall the same as our wall color which is pure white by sherwin williams. See full list on angelamariemade. com Here is a quick overview how to make a pegboard wall: For more info see my disclosures here. *i used pre-primed premium boardsfor the trim of my pegboard , but you can use standard, common 1×4 boards to save money or if you are staining the boards. Free shipping on most orders. Also, caulk the edges for a cleaner final look. *** for more pegboard ideas, check out my mobile diy pegboard stand that i built for our small workshop makeover! Prep the pegboard and frame for paint. Do you need a gap behind pegboard ? Yes, you need a small gap about 3/4″ to 1″ behind a pegboard to allow room for hanging peg hooks from the pegboard. Find deals and low prices on peg board for wall at amazon. com. No drill guide, forstner bit, pocket holes, or fancy tools are needed either. For the vertical boards, i made sure that some of the nails went into the boards that are attached to the wall studs. I just used a brad na. To keep things easy (and for easy transporting), have the pegboard cut to size at the home improvement store. 41″ x 36″ use a miter saw and make the following cuts from the 1×4 premium boards: It also looks great with t. Note, this post contains some affiliate links. Automotive tools, restaurant supplies, power tools, garden tools This pretty and functional diy. Is it cheaper to make your own pegboard ? · build a diy pegboard for ultimate workshop organization. Shop high quality pegboards at honest prices. First, mark the wall studs with a stud finder in the wall space area the pegboard is being installed. I also used a mix of premium pre-primed boards, common boards, and furring strips to save money where possible and just used the premium boards on the front trim (the visible par. A ready to go 4ft x 8ft pegboard panel currently costs $30 at home depot. Install the pegboard trim to frame the pegboard out 4. This tutorial uses ready to go pegboard panel that’s great for an oversized pegboard project. Fill the nail holes with light spackle or wood filler, let dry, and lightly sand smooth. We are installing this pegboard wall just above eye level, right under our wall light.