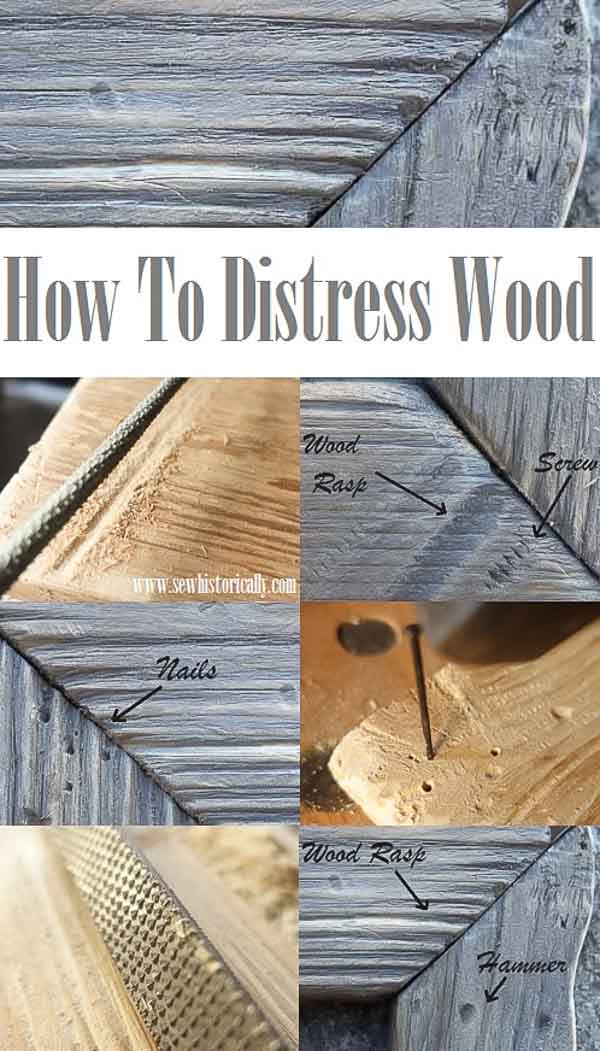
Learn how to distress wood with stains, glazes, paints , and other techniques to achieve an aged and weathered look. In this guide, we have described how to distress wood and listed 11 easy and efficient ways to do so. See full list on upcyclethisdiythat. com Pictures courtesy of brittany bailey then you add a little brown stain(i. e. , minwax ear. But it creates more of the distressed, reclaimed wood and barn wood look. Find out how to create hand-hewn, skip-planed, dented, cracked and end-grain damage on new lumber. It involves using a blow torch. The first one is pretty straightforward. All you need is paint in two contrasting colors and all-purpose glue or school glue. First of all, you put the steel wool in a jar and pour in the vinegar. It’s a great way to distress inexpensive wood. I found it on thriftyandchic. com. If you want to use this method, choose darker wood that contains more tannin. Follow the step-by-step instructions and see the examples of different wood distressing methods. Another simple yet effective technique for giving a wood that unique look. Learn how to make your own distressed wood with cheap and simple techniques, such as beating, brushing, staining, and sanding. Choose any one or a mix of these to achieve the desired appearance on your beloved furniture! There are five steps in this technique. All you have to do is to blacken wood along the grains, and you’re done. To achieve that kind of weathered look, all you need is two stains. First, you have to sand the wood. It all depends on how rough it is. Brittany had an update on this method due to valspar glaze not being produced anymore. Then smear the painted wood with a generous amount. It comes fromradmegan. com. The first step is to paint the wood with a base color coat and let it dry. They are straightforward to follow, and the final effect looks terrific. This is a fascinating method for fans of the more rustic, used look. I found it onprettyhandygirl. com. This way, you get. See step-by-step instructions and pictures for each method and get tips on how to customize your results. Just make sure you don’t overdo it, then paint a coat of finish to seal it. This includes cedar, pine, red oak, redwood, and mahogany. The outcome is kind of like rustic barn/weather-aged wood , and all you need is a glaze. First, you need to stain the wood with any sun-bleached color stain (likerustoleum wood stain) and wipe off the excess. From techniques to tool recommendations, we’ll show you how to distress wood. The result doesn’t have to be very smooth, and it’d probably only need. The first step is to cover a piece of new wood with a br. So follow thislink to learn more 🙂 this is another method i’ve found onprettyhandygirl. com, and i like the final result better. · learn how to make wood look old with our step-by-step tutorial ! It comes from ehow. If you want pallet wood to look aged, this method is excellent for unused pallets. This is another simple way to change a wood ’s appearance and make new wood look old. Below it’s a great example of working with a blow torch found on facebook. Then use tools like hammers, chains, and screws to create dents and scratches, and apply a wood stain or paint for an aged look. I’ve been using this method for a variety of diy decor and upcycling projects like this wooden vase holder or natural easter decor. I think this method is the most popular one online. · to distress wood, start by sanding the surface to remove any finish and roughen the wood. · learn how to distress wood with various techniques to simulate centuries of use and wear. If you like the old cracked paint effect, this is a fantastic way of achieving the look without the cost of a professional crackle medium. The kind of vinegar you use will have an impact on the color of the finished wood. Pictures courtesy of brittany bailey you. If you’re new to sanding, have a look at my wood sanding tips. It’s a bit more complex and involves using more accessories than the previous ones.